For this month, we decided to work on the frame and do some finishing touches to the mobility device. We did end up figuring out why the device acted normal when connected but moved when disconnected and now it works fine. We glued the PVC clamps to the foam board blocks and continued to glue the frame with PVC cement and primer to prevent the frame from detaching. One of our team members did some final touches to the bluetooth and made an app for parental controls. We switched one of the old motor controllers with a new one because one of the wheels kept lagging behind and not moving. To add onto the joystick, a few of our team members worked on improving the joystick and 3D printed housing unit pieces to make it easier for the kid to move the joystick. We started on both the user and construction manuals and duct-taped some of the foam board frame to the actual frame.
Updates
For this month, we were testing out a new code to implement it to the hover buggy. We decided to order bidirectional motors since we found out that the hoverboard has unidirectional motors. This would help the hover buggy become backwards compatible with the new code that will be implemented in November. We created a template to cut out acrylic to serve as the base for the PVC clamps. Throughout this month, we tried fixing abnormal behavior in the hoverboard as one of the wheels moved automatically when unplugged from the computer. When connected, the hover buggy works fine as before. We tried recalibrating the joystick and edited the code many times until we finally found the reason why the hoverboard had abnormal behavior. Another thing we tried implementing to the hover buggy was the use of bluetooth. A few of our team members worked on the bluetooth parental control code to implement the code we will use for the mobility device. Throughout next month, we will be working on the construction and user manual and the frame for the mobility device.
For this month, we got together and familiarized ourselves with the project and we can do to improve on it. We met with the past semester’s team leader and gave us ideas and an overview of how last semester’s team viewed the project. We managed to rewire the joysticks so that all the controls would be consolidated into one joystick, and also color coded the wires so we know what each wire does. After managing to make the hoverboard be controlled by one joystick, a few members proposed to make a larger joystick for the kid to be able to use it and finished a 3D model. The hoverboard still doesn’t move backwards, so a few members worked on the code throughout the month so that the hoverboard would go backwards. Will test the code in October when we get together in lab again. The whole group also brought up ideas about using PVC pipe clamps to attach the frame on the hoverboard.
Now that our wheel can turn with input from a joystick, our team has decided to implement two joysticks that control going forwards and turning left or right. The reason why we decided to go with two joysticks instead of one joystick is to reduce complexity in terms of turning for a child. In other words, when the child uses their left hand to move the joystick forward, both wheels will begin to spin and begin to move forward. When the child moves the joystick to the right, the left wheel will spin and cause the hover buggy to turn right. Conversely, when the child moves the joystick the left, the right wheel will spin and cause the hover buggy to turn left.


Here is a demonstration of our working hover buggy.

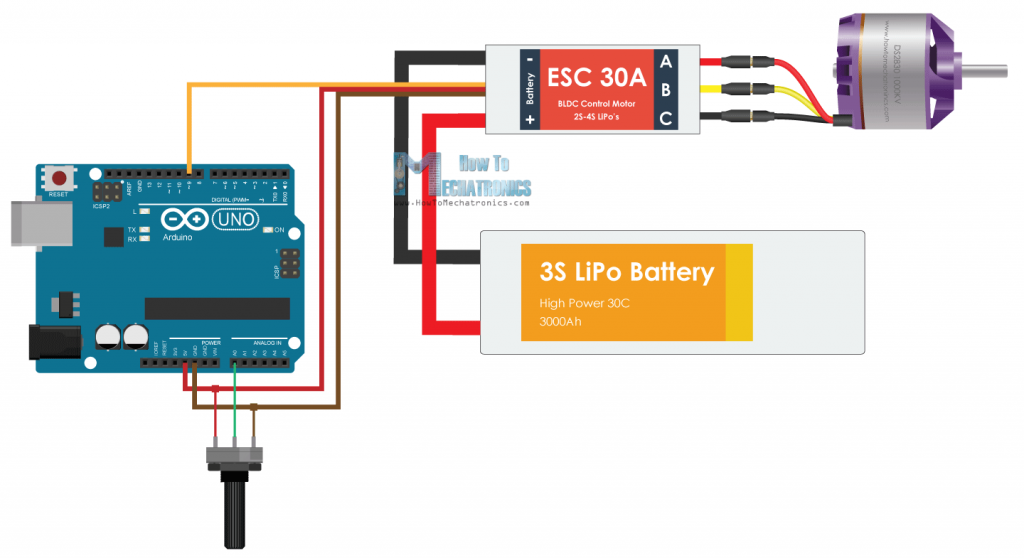
For this month, we successfully rotated both hover board wheels using a joystick. The components used to make the wheels spin are listed below:
- 2x brushless motor (wheel)
- 2x ESC 30A
- Li-Po battery
- Arduino board
- 2x potentiometers (joysticks)
- Jump wires
We modified existing Arduino code for the BLDC motor control to control the speed of the brushless motor from zero to maximum using the potentiometer.
#include <Servo.h>

Servo ESC;     // create servo object to control the ESC

int potValue;  // value from the analog pin

void setup() {
  // Attach the ESC on pin 9
  ESC.attach(9,1000,2000); // (pin, min pulse width, max pulse width in microseconds)
}

void loop() {
  potValue = analogRead(A0);   // reads the value of the potentiometer (value between 0 and 1023)
  potValue = map(potValue, 0, 1023, 0, 180);   // scale it to use it with the servo library (value between 0 and 180)
  ESC.write(potValue);    // Send the signal to the ESC
}
After connecting the wires to their respective inputs, we were able to spin both wheels in the forward direction.

Our next goal is to have only one joystick control the speed of both wheels and have the capability of turning left and right by modifying the existing code we have written this month. We also plan to construct a case for the joystick to mount it securely either onto the frame or the seat.
This month, we evaluated the previous team’s progress completed on the PVC frame, hover board wiring, selected seat, and wiring documentation. As a team, we have decided to move forward with the previous team’s design PVC frame; however, we plan to mount the hover board behind the child seat in order to improve stability.
For this month, we plan to accomplish:
- Understand wiring design on the opened hover board
- Charge and ensure the hover board moves forward, backwards, and turn.
- Create a mounting mechanism for the hover board to the bottom of the PVC frame
- Download Arduino software to control motor using the provided joystick
This month, our team convened and evaluated the materials and documentation provided from previous semesters. Our first task was to assign our roles and address our skills and knowledge that we can provide to the Early Wheels project.
Some of the main goals for the end of the month are outlined below:
- Document every item available
- Identify what kind of tools and materials we will need
- Solidify our understanding of the project
- Read the documentation provided by the team from the previous semester
- Locate additional materials left by the previous team
From our evaluation, we have concluded that:
- We need to reattach the PVC frame to the hoverboard
- Turn on and repair the hoverboard
- Figure out how to properly mount the PVC frame to the hoverboard
This month we focused on wrapping up our promised deliverables and creating smooth transition files for the teams of upcoming semesters. We have stayed on track, with minor challenges. We were able to find many solutions to issues, and for the once we couldn’t we have put together a future directions file for the upcoming teams.
Frame Team Updates:
Over the course of the last month, we actually finished cutting the PVC to the correct length. After which, we were able to actually build the frame! It could even hold one of us without noticeable bending, which means it can certainly hold the weight of an infant. The frame itself wasn’t too difficult to build, but we did have some difficulties with some of the steps we first proposed in the build guide. As a result, we also had to do a complete overhaul of it, and make it much simpler, hopefully, more pain-free. After which we had completed the main task for the semester. We briefly looked into methods of attaching the seat and hoverboard to the frame, but with the end of the semester rearing, we had to shelve the task for next semester. We ended the month working on our final report, hoping to make a smooth transition to the next semester’s design.
In the past month, we have commenced our active build and fabrication period.
The Frame Teams:
This month, the frame team began the build process in earnest. We started the rough draft of the build guide which includes the dimensions and numbers of the various lengths of PVC that are required for the frame. The build guide will eventually be used to instruct the Early Wheels volunteers as they replicate our design. We also received the PVC pipes and joints. After beginning the build guide, we have started using the dimensions to cut the PVC into the proper lengths.
The Controls Team:
The wiring team has successfully wired the STMicro board to the wheel’s motor. Currently, we are working on programming the STMicro board as per the pseudocode directions given by the previous semester’s team. This month we will be testing code to control the speed of the wheels to be below 10 mph. Once the code is complete, we plan on creating schematic diagrams and properly soldering the STMicro and the motor wheels together.
This month was predominantly spent on overviewing the progress of the existing team and coming up with an organizational structure for the Fall 2021 team. We have split the team into two divisions. The Frame Team and the controls team.
Frame Team Update :
- Acquired PVC parts for the team to build frame.
- Performed stress test using CAD to insure integrity of the system to support the weight of a toddler.
Control Team Update:
- Familiarized the team with the STMicro controller.
- Re-structured the controls for the the motor.
- Started working on a new wiring schematoc diagrtam.